Authentication & Authorization
Serenity uses integrated authentication and authorization systems in the ASP.NET Core and provides some additional abstractions and helper classes to make it possible to:
- Work in environments other than web applications,
- Free-form permission keys for fine-grained access to resources
- Declarative permissions for data manipulation and querying
- User impersonation
- Transiently granting permissions
See the following document for more information about ASP.NET Core security:
ASP.NET Core Security Topics - Microsoft Docs
IUserAccessor Interface
The current user in ASP.NET Core applications can be retrieved through HttpContext.User but accessing it directly would tie Serenity to web applications only.
To abstract this, and make Serenity also useful for console, desktop, and other types of applications, we provide an IUserAccessor interface.
The default implementation for this interface uses HttpContext.User in web applications but can be implemented differently for other kinds of applications/tests.
IPermissionService and IUserRetrieveService Abstractions
We also provide the following abstractions for permission checking (authorization) and user detail retrieval.
As the framework itself doesn't have a default implementation for these abstractions, they should be provided in the application itself through dependency injection.
Serene / StartSharp applications have custom implementations and register them in Startup.cs:
services.AddSingleton<IUserRetrieveService,
    AppServices.UserRetrieveService>();
services.AddSingleton<IPermissionService,
    AppServices.PermissionService>();
You may have a look at these sample implementations before trying to write your own.
Permission Keys
Serenity has a fine-grained user access control system that is based on free-form permission keys that are assigned to resources like navigation, pages, and service calls.
Permissions can be assigned directly to users or indirectly through assigned roles which can also have a set of permissions.
These permissions can be granted to users directly, or indirectly via their role assignments.
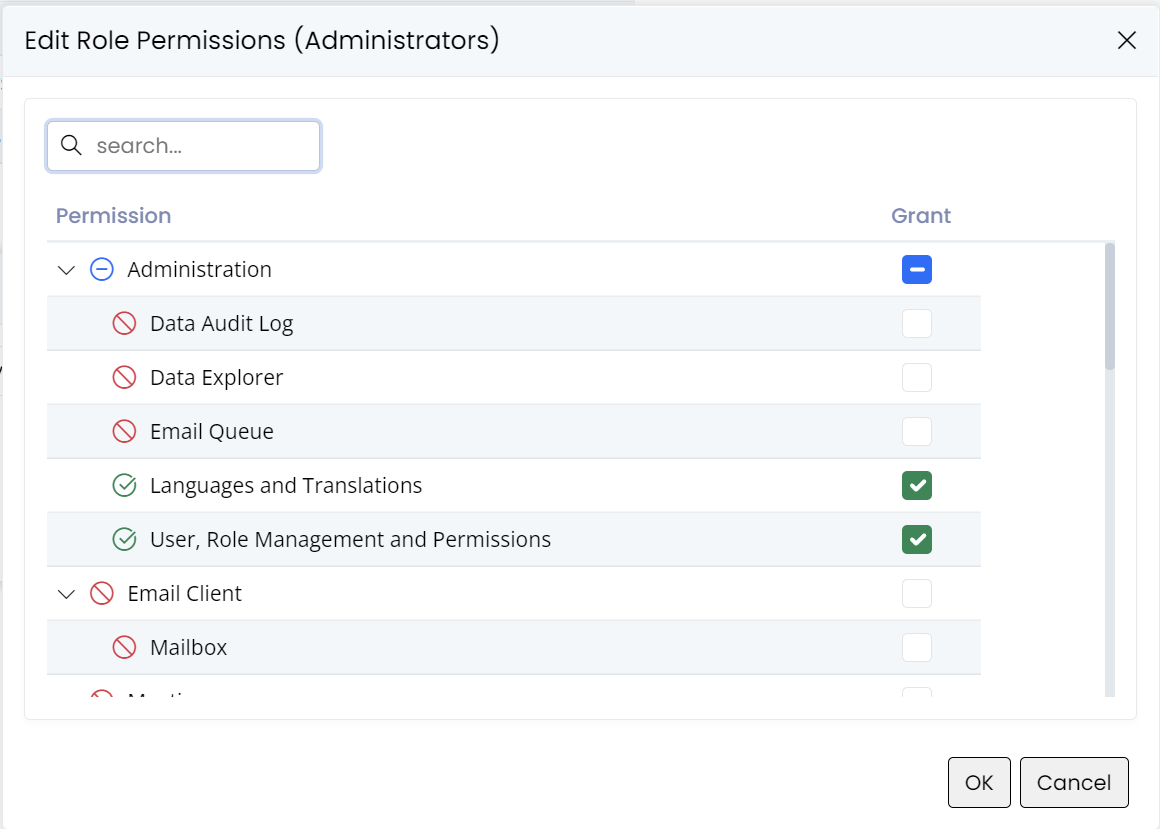
In the screen above we see the textual representations of the permission keys we talk about, but internally they correspond to the following free-form strings:
"Administration:DataAuditLog""Administration:DataExplorer""Administration:EmailQueue""Administration:Translation""Administration:Security"
Declarative Permission Attributes
Serenity has several permission attributes which declaratively determine the required permission key to perform particular actions:
- DeletePermissionAttribute
- ModifyPermissionAttribute
- NavigationPermissionAttribute
- ReadPermissionAttribute
- ServiceLookupPermissionAttribute
- UpdatePermissionAttribute
These permission attributes are assigned to various resource types like entities:
    [ReadPermission("Administration:Security")]
    [ModifyPermission("Administration:Security")]
    [LookupScript(Permission = "Administration:Security")]
    public sealed class UserRow
    {
        // ...
    }
In the example above, the read, modify, and lookup permissions for the User entity are assigned as "Administration:Security".
If, for example, we wanted to assign different permissions for creating, updating, and deleting a user:
    [ReadPermission("Administration:User:Read")]
    [InsertPermission("Administration:User:Insert")]
    [UpdatePermission("Administration:User:Update")]
    [InsertPermission("Administration:User:Delete")]
    [LookupScript(Permission = "Administration:Security")]
    public sealed class UserRow
    {
        // ...
    }
Having the ability for fine-grained permissions does not always mean you should use them. We don't recommend defining/assigning different permissions for every type of entity and every type of action as it would make managing and maintaining them very difficult.
The usual rule of thumb is, don't introduce a new permission key unless there is an actual need for such fine-grained control.
For example, in Serene, we assigned the "Administration:Security" permission for both the User and Role entities and several other operations. Before assigning them individual permission keys, you should ask yourself if there is an actual business requirement for an administrator to manage only Roles, while another administrator manages only Users. If yes, define separate permissions, if not wait until you need it.
This is the same for Insert/Update/Delete permissions. Do you need an administrator to only create users, another to only update them, and another admin to only delete them?
Permission Key Definitions
Permission keys themselves are usually defined in a static class:
namespace Serene.Administration
{
    [NestedPermissionKeys]
    [DisplayName("Administration")]
    public class PermissionKeys
    {
        [Description("User, Role Management and Permissions")]
        public const string Security = "Administration:Security";

        [Description("Languages and Translations")]
        public const string Translation = "Administration:Translation";
    }
}
Even though this is not mandatory, it is common practice and is recommended to make it easier to access them via intelli-sense, determine their display names, and avoid typing errors.
Authorization Attributes for Actions
To make it easy to validate permissions we provide some attributes in addition to the built-in ASP.NET [Authorize] attribute.
They have overloads that accept a permission key parameter, which automatically validates the permission.
Difference between the two lies in the way they handle unauthenticated access attempts. While the [PageAuthorize] attribute throws an exception, [ServiceAuthorize] provides an AJAX call-friendly service error.
There are also specialized versions of the ServiceAuthorize attribute that reads the permission key from the target type (usually an entity/row type) by checking a set of permission attributes, using the first one the target type has:
- AuthorizeCreateAttribute:
Insert,Modify, orReadpermission attributes. - AuthorizeDeleteAttribute:
Delete,Modify, orReadpermission attributes. - AuthorizeListAttribute:
ReadorServiceLookuppermission attributes. - AuthorizeUpdateAttribute:
Update,Modify, orReadpermission attributes.
Impersonation
- The
IImpersonatorinterface and its default implementation ImpersonatingUserAccessor class provide an option to execute an action as if another user is currently logged in.
This can be useful to call a service that requires special permissions in the context of an admin or another privileged user, while a user with a more limited set of permissions is logged in.
ImpersonatingUserAccessor wraps any class implementing the IUserAccessor interface and adds an impersonation ability to that.
In recent versions, AppServices.UserAccessor class already has built-in impersonation support. Please check your UserAccessor.cs file to see if already implements the IImpersonator interface.
If not, you should register it by wrapping your UserAccessor implementation in the Startup.cs:
services.AddSingleton<IHttpContextItemsAccessor, HttpContextItemsAccessor>();
services.AddSingletonWrapped<IUserAccessor, ImpersonatingUserAccessor, AppServices.UserAccessor>();
Then anywhere you need temporary impersonation, you should cast the IUserAccessor service to IImpersonator:
public class SomeHandler : IRequestHandler
{
    private IUserAccessor userAccessor;

    public SomeHandler(IUserAccessor userAccessor)
    {
        this.userAccessor = userAccessor ??
            throw new ArgumentNullException(nameof(userAccessor));
    }

    public void SomeMethod()
    {
        var impersonator = (IImpersonator)userAccessor;

        // lets say current user is "test" here
        impersonator.Impersonate("admin");
        try
        {
            // here current user is "admin"
            PerformSomeOperationAsAdmin();
        }
        finally
        {
            impersonator.UndoImpersonate();
        }
        // here current user becomes "test" again
    }
}
Login As (also called impersonation)
StartSharp also provides an option to log in as (e.g. impersonate) another user on the user administration page:
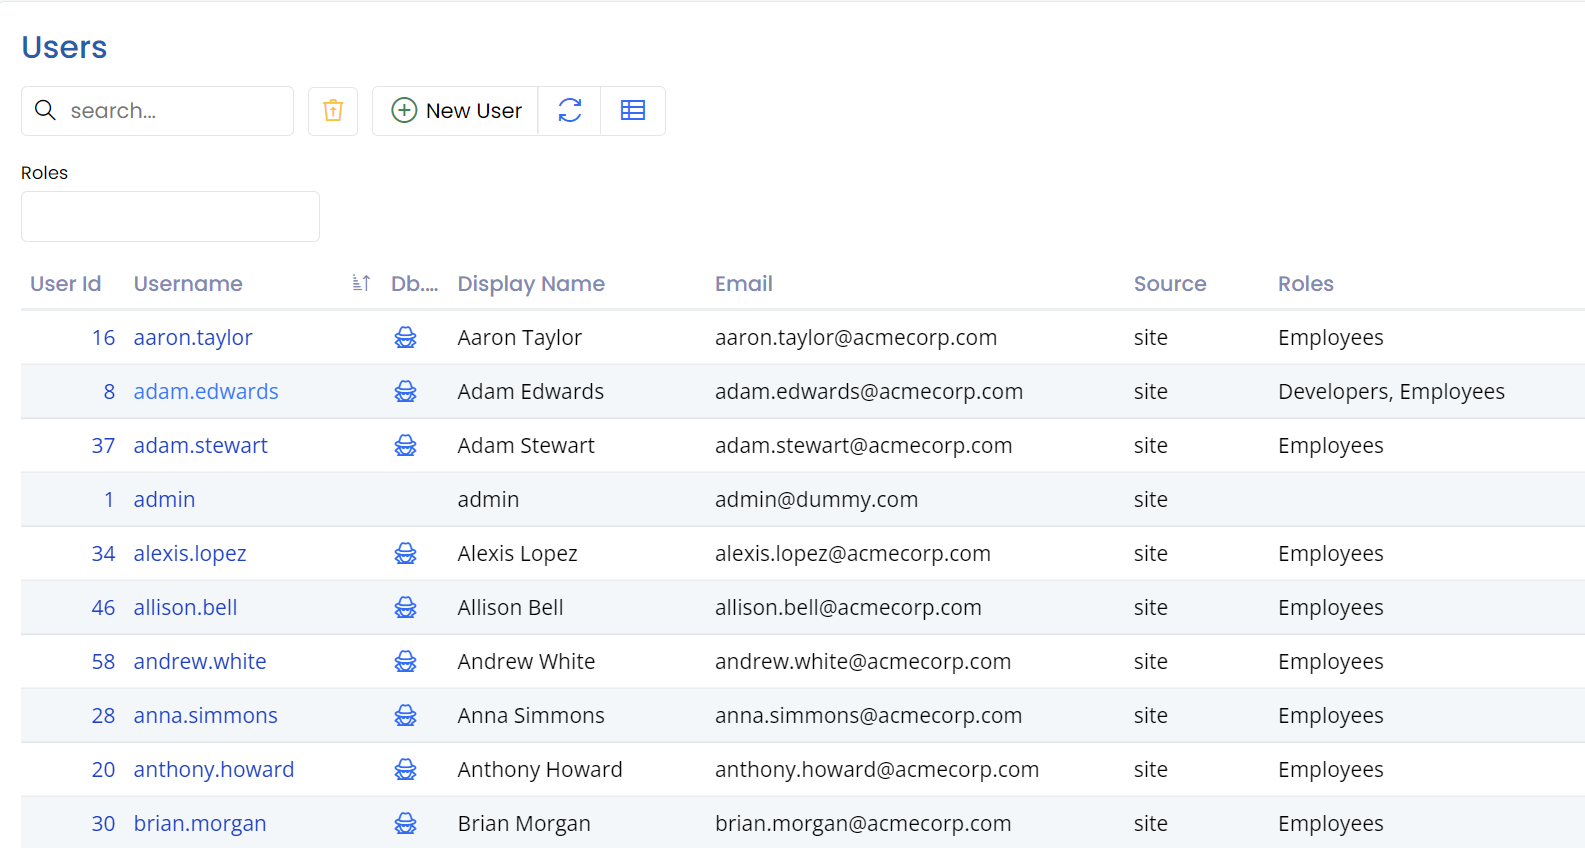
By default, only the super admin (e.g. admin user) can perform this action.
You may right-click the spy icon next to a username, and use the open-in new incognito window menu item.
We don't allow opening in the same browser window, as this would effectively mean signing the current user out.
Transiently Granting Permissions
Sometimes it would be better to temporarily (e.g. transiently) grant a user some permissions instead of impersonating an admin. ITransientGrantor interface and its default implementation TransientGrantingPermissionService can do just that.
In recent versions, AppServices.PermissionService class already has built-in transient-grant support. Please check your PermissionService.cs file to see if already implements the ITransientGrantor interface.
If not, it requires wrapping the registration in Startup.cs:
services.AddSingleton<IHttpContextItemsAccessor, HttpContextItemsAccessor>();
services.AddSingletonWrapped<IPermissionService, TransientGrantingPermissionService, AppServices.PermissionService>();
Then you can use it in a similar way to impersonation:
public class SomeHandler : IRequestHandler
{
    private IPermissionService permissions;

    public SomeHandler(IPermissionService permissions)
    {
        this.permissions = permissions ??
            throw new ArgumentNullException(nameof(permissions));
    }

    public void SomeMethod()
    {
        var transientGrantor = (ITransientGrantor)permissions;

        transientGrantor.Grant("Administration:Security");
        try
        {
            // here the current user temporarily has
            // "Administration:Security" permission
            PerformSomeOperationAsAdmin();
        }
        finally
        {
            transientGrantor.UndoGrant();
        }
        // here no longer
    }
}
Please note that granting temporary permission is performed in memory and is not stored anywhere.