Managing Primary and Gallery Images
To add primary and gallery images to both Movie and Person records, start with a database migration:
using FluentMigrator;

namespace MovieTutorial.Migrations.DefaultDB;

[DefaultDB, MigrationKey(20221122_1151)]
public class DefaultDB_20221122_1151_PersonMovieImages : AutoReversingMigration
{
    public override void Up()
    {
        Alter.Table("Person")
            .AddColumn("PrimaryImage").AsString(100).Nullable()
            .AddColumn("GalleryImages").AsString(int.MaxValue).Nullable();

        Alter.Table("Movie")
            .AddColumn("PrimaryImage").AsString(100).Nullable()
            .AddColumn("GalleryImages").AsString(int.MaxValue).Nullable();
    }
}
This migration adds the "PrimaryImage" and "GalleryImages" columns to both the "Person" and "Movie" tables in the database.
Updating PersonRow and MovieRow
Next, modify the PersonRow and MovieRow classes to include properties for primary and gallery images:
public sealed class PersonRow : Row<PersonRow.RowFields>, IIdRow, INameRow
{
    // ...

    [DisplayName("Primary Image"), Size(100)]
    [ImageUploadEditor(FilenameFormat = "Person/PrimaryImage/~")]
    public string PrimaryImage { get => fields.PrimaryImage[this]; set => fields.PrimaryImage[this] = value; }

    [DisplayName("Gallery Images")]
    [MultipleImageUploadEditor(FilenameFormat = "Person/GalleryImages/~")]
    public string GalleryImages { get => fields.GalleryImages[this]; set => fields.GalleryImages[this] = value; }

    public class RowFields : RowFieldsBase
    {
        // ...
        public StringField PrimaryImage;
        public StringField GalleryImages;
    }
}
public sealed class MovieRow : Row<MoviesRow.RowFields>, IIdRow, INameRow
{
    // ...
    [DisplayName("Primary Image"), Size(100)]
    [ImageUploadEditor(FilenameFormat = "Movie/PrimaryImage/~")]
    public string PrimaryImage { get => fields.PrimaryImage[this]; set => fields.PrimaryImage[this] = value; }

    [DisplayName("Gallery Images")]
    [MultipleImageUploadEditor(FilenameFormat = "Movie/GalleryImages/~")]
    public string GalleryImages { get => fields.GalleryImages[this]; set => fields.GalleryImages[this] = value; }

    public class RowFields : RowFieldsBase
    {
        // ...
        public StringField PrimaryImage;
        public StringField GalleryImages;
    }
}
These modifications allow you to manage primary and gallery images for both Person and Movie records.
The FilenameFormat property within the attributes is used to define the format for image filenames. For example, the primary image for a Person will be uploaded to a folder located under App_Data/upload/Person/PrimaryImage/.
You have the flexibility to change the upload root (default is App_Data/upload) by modifying the UploadSettings key in the appsettings.json file.
The use of ~ at the end of the FilenameFormat serves as a shortcut for the automatic naming scheme, which is defined as {1:00000}/{0:00000000}_{2}.
Here's how this naming scheme works:
Parameter {0} is replaced with the identity of the record, such as PersonID.
Parameter {1} represents the identity divided by 1000. This division is helpful for limiting the number of files stored in a single directory.
Parameter {2} is a unique string, for example, 6l55nk6v2tiyi. It is used to generate a new file name with every upload. This approach helps prevent caching-related issues on the client side and adds a layer of security since file names cannot be deduced without a specific link.
As a result, a file uploaded for a Person's primary image will be stored at a path like the following:
App_Data\upload\Person\PrimaryImage\00000\00000001_6l55nk6v2tiyi.jpg
It's important to note that you are not restricted to this naming scheme and can specify your custom format, like PersonPrimaryImage_{0}_{2}.
The
ImageUploadEditorstores the file name directly in a string field.The
MultipleImageUploadEditorstores file names in a string field using a JSON array format.
The next step involves adding these fields to the forms in MovieForm.cs and PersonForm.cs:
public class PersonForm
{
    //...
    public string PrimaryImage { get; set; }
    public string GalleryImages { get; set; }
}
public class MovieForm
{
    //...
    public string PrimaryImage { get; set; }
    public string GalleryImages { get; set; }
}
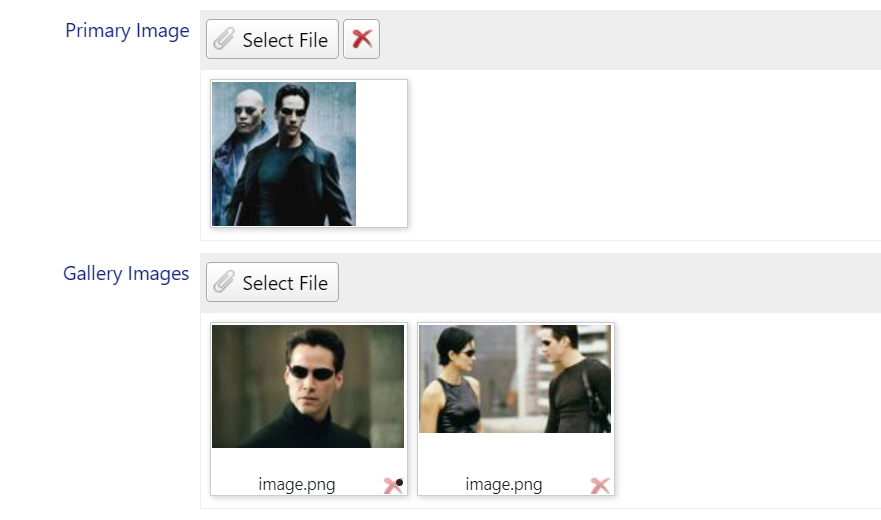
This results in the following user interface:

Removing Northwind and Other Samples
As the project has now reached a good state, it's recommended to remove Northwind and other samples from the MovieTutorial project. For detailed instructions, refer to the how-to topic: How To: Removing Northwind and Other Samples.