Building a Student Information System
This tutorial is contributed by
Burcu Canur.
What you will build
In this tutorial, we build a simple Student Information System using Serenity. The system will let you manage:
- Departments (e.g., Computer Science, Mathematics)
- Terms (academic periods, e.g., Fall 2026, Spring 2027)
- Courses (with departments, codes, and credits)
- Students (with personal info and department assignment)
- Student enrollments (student ↔ course relationships via a master–detail grid)
- Teachers and course assignments
- Grades (midterm/final/average for each student/course/term)
You’ll see how to:
- Define database schema using migrations
- Generate CRUD screens with Sergen
- Build a master–detail UI (students + enrollments)
- Add filtering, exporting (Excel/PDF), and friendly navigation
Defining the Department Table with a Migration
Let's start by defining a database table to store the departments that students belong to.
Let's add a new migration named Department using the timestamp-based naming convention. This approach helps maintain consistency and avoids conflicts in team environments.
In this migration, define the Department table with the following fields:
- An auto-incrementing
Idcolumn as the primary key - A
Namecolumn used to store the department name, marked as unique
The migration derives from AutoReversingMigration, allowing rollback operations to be handled automatically during database downgrades and simplifying the migration lifecycle.
using FluentMigrator;
namespace CourseTutorial.Migrations.DefaultDB;

[DefaultDB, Migration(20250614_1700)]
public class DefaultDB_20250614_1700_Department : AutoReversingMigration
{
    public override void Up()
    {
        Create.Table("Department")
            .WithColumn("Id").AsInt32().IdentityKey(this)
            .WithColumn("Name").AsString(100).NotNullable().Unique();
    }
}
Verifying the Migration
After running the migration, let's verify the applied schema changes.
Check that the Department table has been created:
- Open SQL Server Management Studio (SSMS) or Visual Studio
- Connect to the database used by the Serenity application
- Expand the Tables node under the target database
- Locate the
[dbo].[Department]table
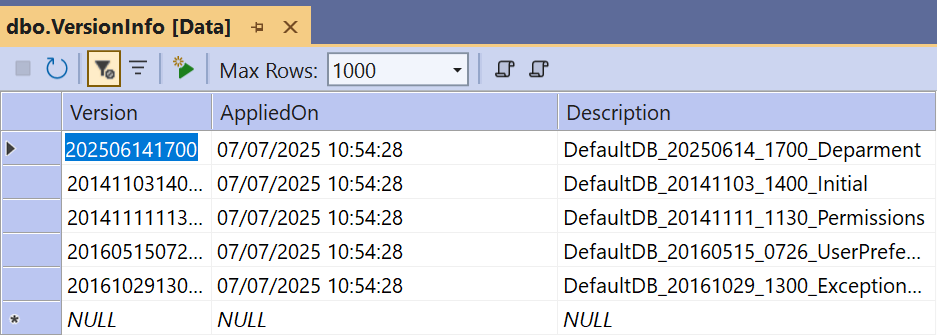
Executed migrations are tracked in the [dbo].[VersionInfo] table, which records version numbers and timestamps to ensure schema consistency across environments.
Generating Code for the Department Table
With the database structure in place, generate the required application code using the Serenity Code Generator (Sergen).
Execute the generator from the terminal:
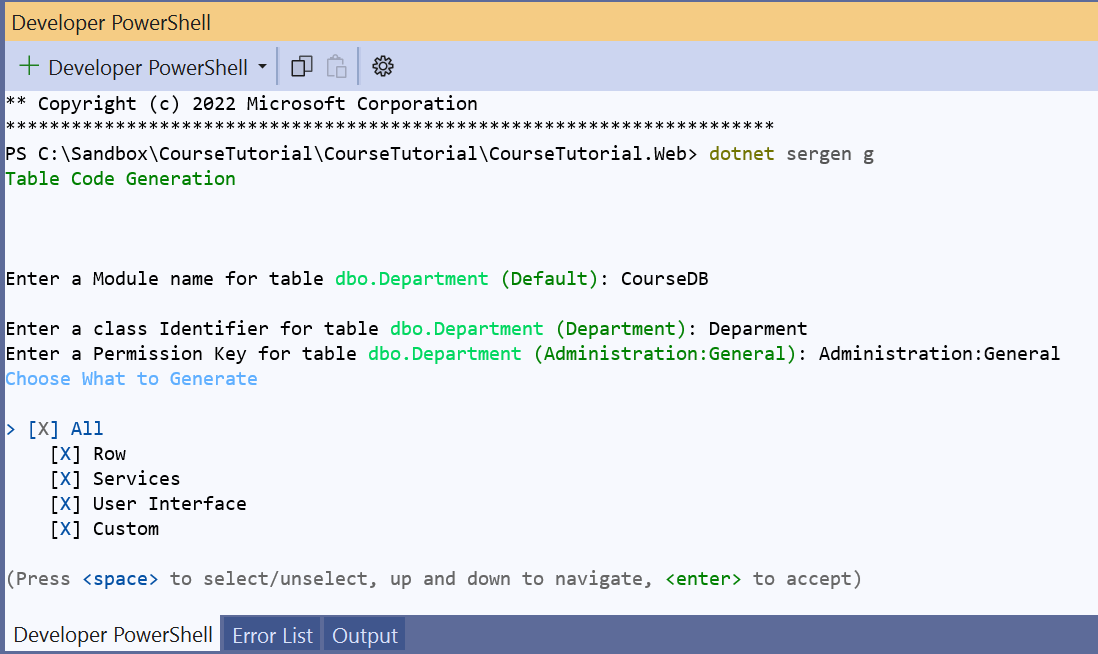
When prompted, select the Default database connection.
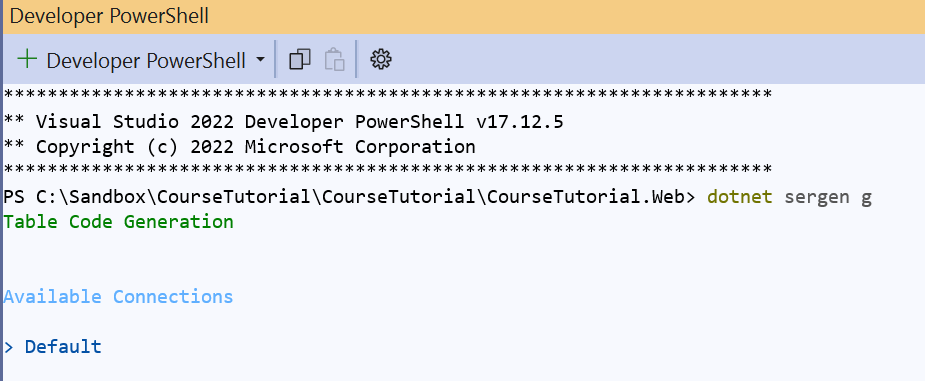
Sergen then displays the list of available tables.
Select the dbo.Department table using the Space key, and confirm the selection by pressing Enter.
When prompted for a module name, enter CourseDB.
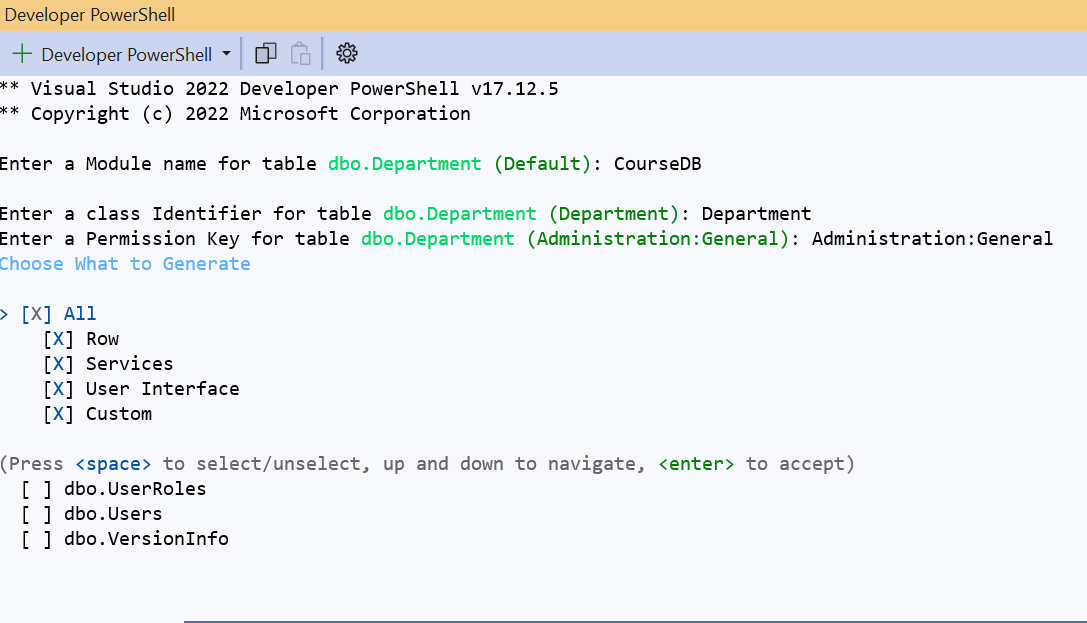
Keep the default All option enabled; Sergen generates all required files, including repositories, services, and user interface components, resulting in a fully functional editing interface.
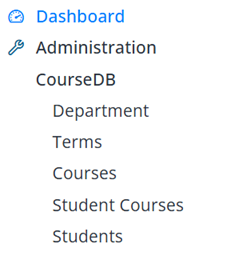
After code generation is complete, start the application; the Department entity becomes available under the CourseDB module in the navigation menu.
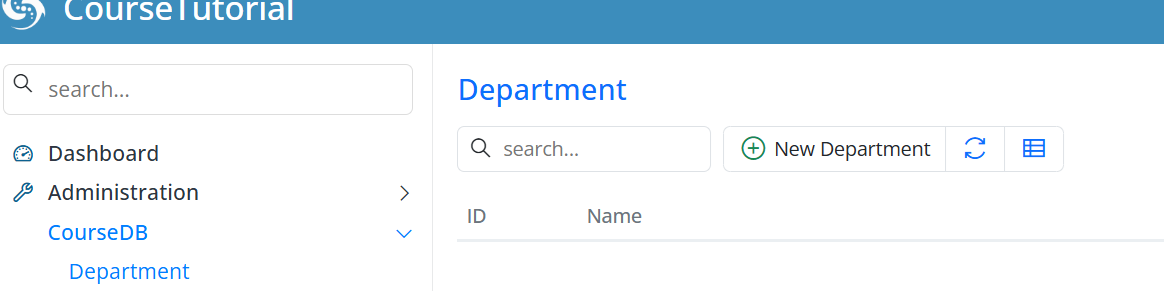
Adding Sample Data for Department
At this stage, the Department table and its related user interface are ready.
To support upcoming relationships, add a few sample department records.
Using the CourseDB → Department screen, add the following records:
- Computer Science
- Mathematics
- Physics
Reference these records later from tables such as Courses, Students, and Teachers.
Adding sample data at this stage will provide a more meaningful working environment when testing the rest of the application.
Continuing the Student Information System Development
After defining the Department table, create migrations for the remaining core entities of the system:
- Term
- Courses
- Student and StudentCourses
- Other related tables
This approach ensures that the database schema is completed in a structured and consistent manner.
Throughout this process, the system is developed incrementally with a focus on clarity and maintainability. The following principles guide this stage of development:
Consistent naming conventions
Correct chronological ordering of migrations
Proper foreign key definitions to ensure data integrity
Creating the Term Table Migration
Following the creation of the Department table, introduce a new migration for the Term table. This table stores academic terms such as Spring 2027 and Fall 2026.
The migration, named Term according to the timestamp-based convention, defines the following fields:
- An auto-incrementing primary key
- A required and unique
Namecolumn StartDateandEndDatecolumns defining the academic period- An
IsActivecolumn defined as a non-nullable boolean with a default value offalse, indicating whether the term is currently active - An
IsRegistrationOpencolumn defined as a non-nullable boolean with a default value offalse, indicating whether course registration is open
The migration derives from AutoReversingMigration, allowing rollback operations to be handled automatically during iterative development.
using FluentMigrator;
namespace CourseTutorial4.Migrations.DefaultDB;

[DefaultDB, Migration(20250614_1706)]
public class DefaultDB_20250614_1706_Term : AutoReversingMigration
{
    public override void Up()
    {
        Create.Table("Terms")
            .WithColumn("Id").AsInt32().Identity().PrimaryKey()
            .WithColumn("Name").AsString(50).NotNullable().Unique()
            .WithColumn("StartDate").AsDateTime().NotNullable()
            .WithColumn("EndDate").AsDateTime().NotNullable()
            .WithColumn("IsActive").AsBoolean().NotNullable().WithDefaultValue(false)
            .WithColumn("IsRegistrationOpen").AsBoolean().NotNullable().WithDefaultValue(false);
    }
}
Generating Code for the Term Table
After applying the migration, generate the required application code using the Serenity Code Generator (Sergen).
During code generation:
- Select the
dbo.Termtable - Enter
CourseDBas the module name - Keep the default
Alloption selected to generate the complete set of files
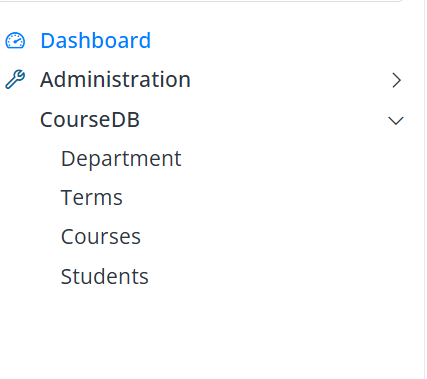
After code generation is complete, start the application; the Term table becomes available under the CourseDB module in the navigation menu.
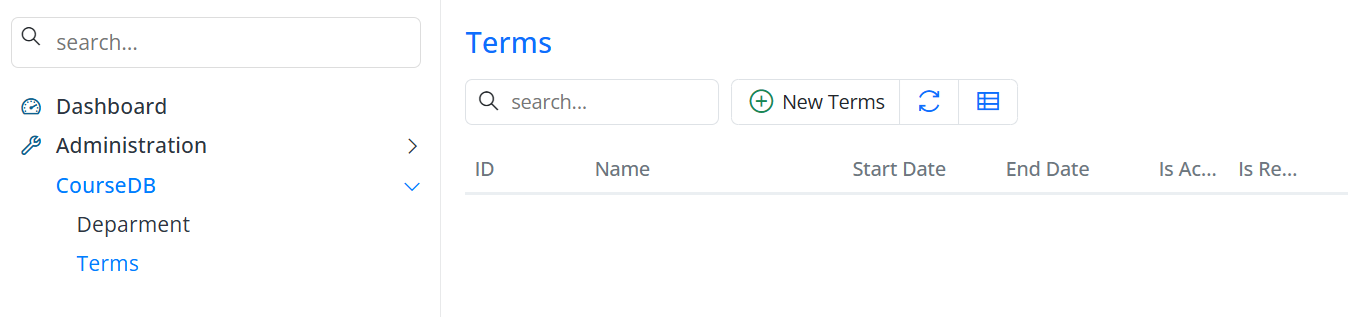
Adding Sample Data for the Terms Table
After creating the Terms table and its UI, add sample term records to use in later stages of the application.
Open the CourseDB → Terms screen and create the following records:
| Term | Start Date | End Date | Is Active | Is Registration Open |
|---|---|---|---|---|
| Fall 2026 | 09.01.2026 | 12.31.2026 | True | True |
| Spring 2027 | 02.01.2027 | 06.15.2027 | False | False |
Use these term records as references during student course registrations and related operations.
Creating the Courses Table Migration
After the Term table is in place, add a migration for the Courses table. The schema is designed with a focus on relational integrity and clarity:
- Auto-incrementing primary key
Id DepartmentIdcolumn defined as a foreign key referencing theDepartmenttable- Required
Namecolumn with a maximum length of 100 characters - Required and unique
Codecolumn with a maximum length of 20 characters - Required
Creditcolumn indicating course credits
This structure ensures that courses are correctly associated with departments while enforcing uniqueness and consistency.
using FluentMigrator;
namespace CourseTutorial.Migrations.DefaultDB;

[DefaultDB, Migration(20250615_1220)]
public class DefaultDB_20250615_1220_Courses : AutoReversingMigration
{
    public override void Up()
    {
        Create.Table("Courses")
            .WithColumn("Id").AsInt32().PrimaryKey().IdentityKey(this)
            .WithColumn("DepartmentId").AsInt32().NotNullable()
                .ForeignKey("FK_Courses_DepartmentId", "Department", "Id")
            .WithColumn("Name").AsString(100).NotNullable()
            .WithColumn("Code").AsString(20).NotNullable().Unique()
            .WithColumn("Credit").AsInt32().NotNullable();
    }
}
Verifying the Courses Migration
After applying the migration, let's verify the schema changes to ensure correctness.
Verification includes:
- Locating the
Coursestable in SQL Server Management Studio (SSMS) or Visual Studio - Reviewing migration history in the
[dbo].[VersionInfo]table - Validating the foreign key constraint between
Courses.DepartmentIdandDepartment.Id
This confirmation ensures that the database schema matches the intended design.
Generating Code for the Courses Table
Generate application code for the Courses table using the Serenity Code Generator.
During this step:
- Select the
dbo.Coursestable - Specify
CourseDBas the module name - Retain the default
Alloption to generate UI, repository, and service files
After code generation, start the application; the Courses table appears under the CourseDB module in the navigation menu, confirming successful integration.
The generated user interface provides full CRUD functionality for managing course records.
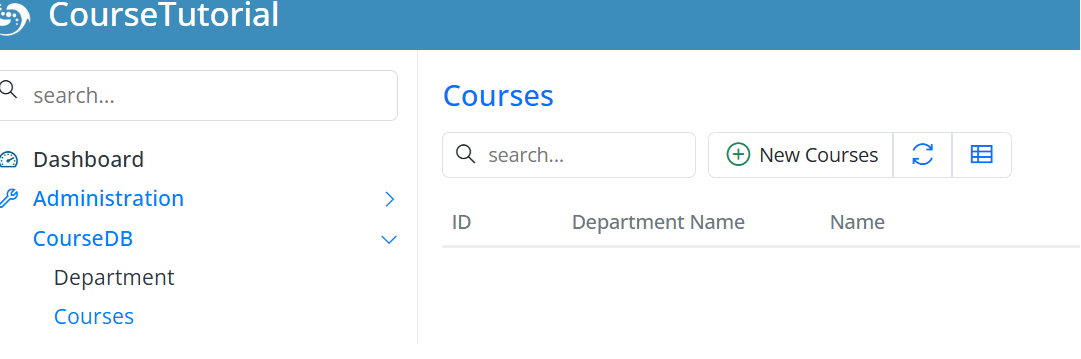
Adding Sample Data for the Courses Table
Now add sample course records for the upcoming steps.
Open the CourseDB → Courses screen and create the following records:
| Department | Course | Code | Credit |
|---|---|---|---|
| Computer Science | Introduction to Programming | CS101 | 4 |
| Computer Science | Data Structures | CS201 | 4 |
| Mathematics | Calculus I | MATH101 | 3 |
| Physics | Physics I | PHYS101 | 3 |
Use these course records as references when creating StudentCourses relationships in later stages.
Also create migrations for the Students and StudentCourses tables to model the master–detail relationship between students and courses.
Student and StudentCourses Migration
Define the Students and StudentCourses tables within the same migration file to ensure relationships are created consistently from the start.
using FluentMigrator;

namespace CourseTutorial.Migrations.DefaultDB
{
    [DefaultDB, Migration(20250616_1000)]
    public class DefaultDB_20250616_1000_StudentsAndStudentCourses : AutoReversingMigration
    {
        public override void Up()
        {
            Create.Table("Students")
                .WithColumn("Id").AsInt32().PrimaryKey().Identity()
                .WithColumn("FirstName").AsString(100).NotNullable()
                .WithColumn("LastName").AsString(100).NotNullable()
                .WithColumn("FullName").AsString(201).NotNullable()
                .WithColumn("BirthDate").AsDateTime().Nullable()
                .WithColumn("DepartmentId").AsInt32().NotNullable()
                    .ForeignKey("FK_Students_DepartmentId", "Department", "Id");

            Create.Table("StudentCourses")
                .WithColumn("Id").AsInt32().PrimaryKey().Identity()
                .WithColumn("StudentId").AsInt32().NotNullable()
                    .ForeignKey("FK_StudentCourses_StudentId", "Students", "Id")
                .WithColumn("CourseId").AsInt32().NotNullable()
                    .ForeignKey("FK_StudentCourses_CourseId", "Courses", "Id")
                .WithColumn("TermId").AsInt32().Nullable()
                    .ForeignKey("FK_StudentCourses_TermId", "Terms", "Id");

            Create.UniqueConstraint("UQ_Student_Course_Term")
                .OnTable("StudentCourses")
                .Columns("StudentId", "CourseId", "TermId");
        }
    }
}
Once the migration is applied, build the project and generate the Students and StudentCourses modules using the Serenity Code Generator.
Start the application; the new screens become available in the navigation menu, providing fully functional CRUD interfaces for managing students and their course enrollments.
Adding Sample Data for Students
After creating the Students and StudentCourses tables, let’s add a few sample student records to better demonstrate the master–detail relationship.
Open the CourseDB → Students screen and create the following records:
| Full Name | Birth Date | Department |
|---|---|---|
| John Smith | 15.03.2004 | Computer Science |
| Emily Johnson | 22.07.2003 | Mathematics |
| Michael Brown | 05.11.2004 | Physics |
| Sarah Davis | 18.05.2003 | Computer Science |
The StudentCourses table was already defined in the migration we created earlier. However, this table will not be used as a standalone screen.
Manage StudentCourses records within the Students dialog using a master–detail structure.
With this structure:
Students represent the master records
StudentCourses represent the detail records
Perform course assignment operations within the Students dialog.
Establishing the Student – StudentCourses Master–Detail Relationship
In this section, define a master–detail relationship between the Student and StudentCourses tables.
With this approach, StudentCourses records are managed as part of the related Student record rather than through an independent screen.
If you use StudentCourses as a standalone page, course registrations can be created without student context, weakening relational integrity and complicating data management.
In a real-world scenario, a course registration is not used independently. Each course record belongs to a specific student and is managed within that relationship.
For this reason, the StudentCourses structure is configured according to the master–detail architecture, and its standalone page usage is removed.
After this adjustment:
There is no independent menu or page for StudentCourses
Course records are viewed and edited only within the Student dialog
Each course record is stored in relation to its corresponding Student record
Detail records are managed within the context of the master record
Removing the StudentCourses Page Structure
When you create a Page class for an entity in Serenity, the framework provides a standalone list screen for its records and adds it to the navigation menu.
However, in a master–detail architecture, detail tables are not intended to be presented as independent pages. Instead, detail records are managed within the dialog of the master record.
For this reason, the page structure created for StudentCourses is removed.
Remove the following files (they are not needed when StudentCourses is managed as a detail grid):
StudentCoursesPage.cs
StudentCoursesPage.tsx
Also, if there is a menu item defined for StudentCourses in the Navigation.cs file, remove it.
After making these changes, rebuild the project.
As a result, StudentCourses no longer appears in the navigation menu and cannot be used as a standalone screen. Manage StudentCourses records only within the Student dialog.
Defining GridEditorBase for StudentCourses
In a master–detail architecture, use a grid editor to edit detail records within the master dialog. Serenity provides the GridEditorBase class for this purpose.
Therefore, define a GridEditorBase-based editor for StudentCourses instead of using the EntityGrid-based structure.
Rename the existing StudentCoursesGrid.tsx file to StudentCoursesEditor.tsx and update its contents as follows:
StudentCoursesEditor.tsx
import { Decorators } from '@serenity-is/corelib';
import { StudentCoursesColumns, StudentCoursesRow } from '../../ServerTypes/CourseDB';
import { GridEditorBase } from '@serenity-is/extensions'

@Decorators.registerEditor('CourseTutorial.CourseDB.StudentCoursesEditor')
export class StudentCoursesEditor<P = {}> extends GridEditorBase<StudentCoursesRow, P> {
    protected override getColumnsKey() { return StudentCoursesColumns.columnsKey; }
    protected override getLocalTextPrefix() { return StudentCoursesRow.localTextPrefix; }
}
This definition creates a grid editor for managing StudentCourses records.
This editor:
It is used only within the Student dialog and manages detail records together with the master record.
Allows adding, editing, and deleting detail records directly within the dialog and is not used as a standalone list screen
This structure ensures that StudentCourses records are managed in accordance with the master–detail architecture.
Now, build the project.
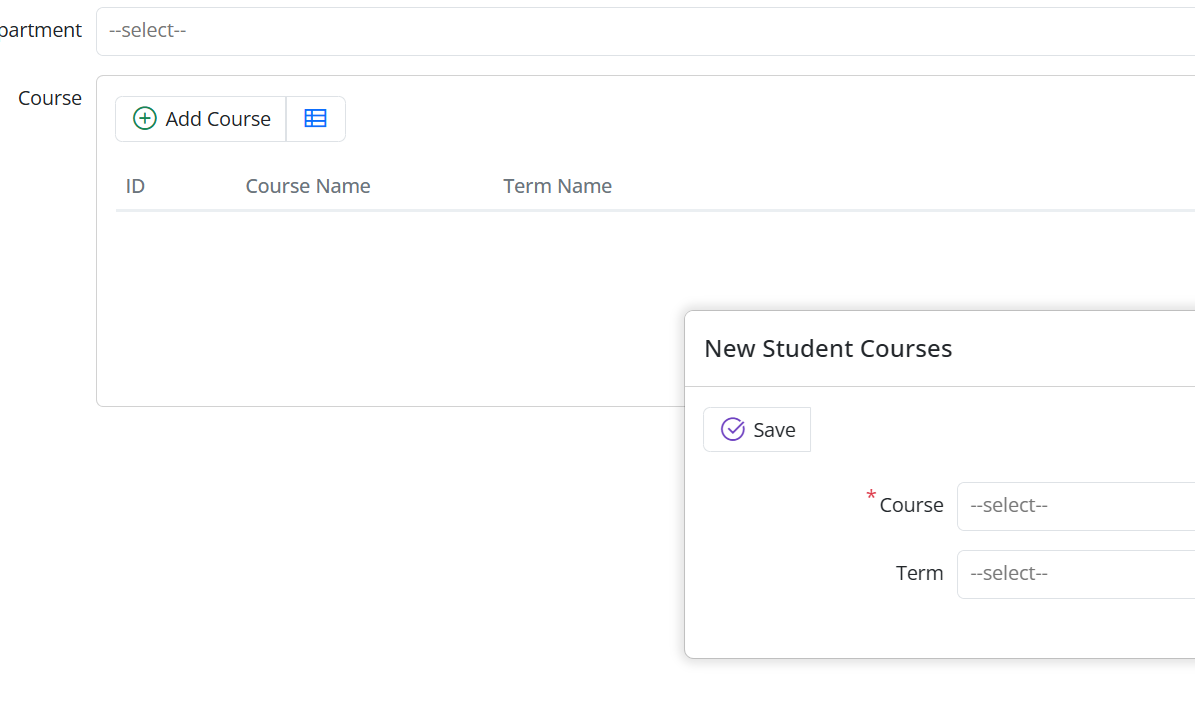
Adding the StudentCourses Field to StudentsForm.cs
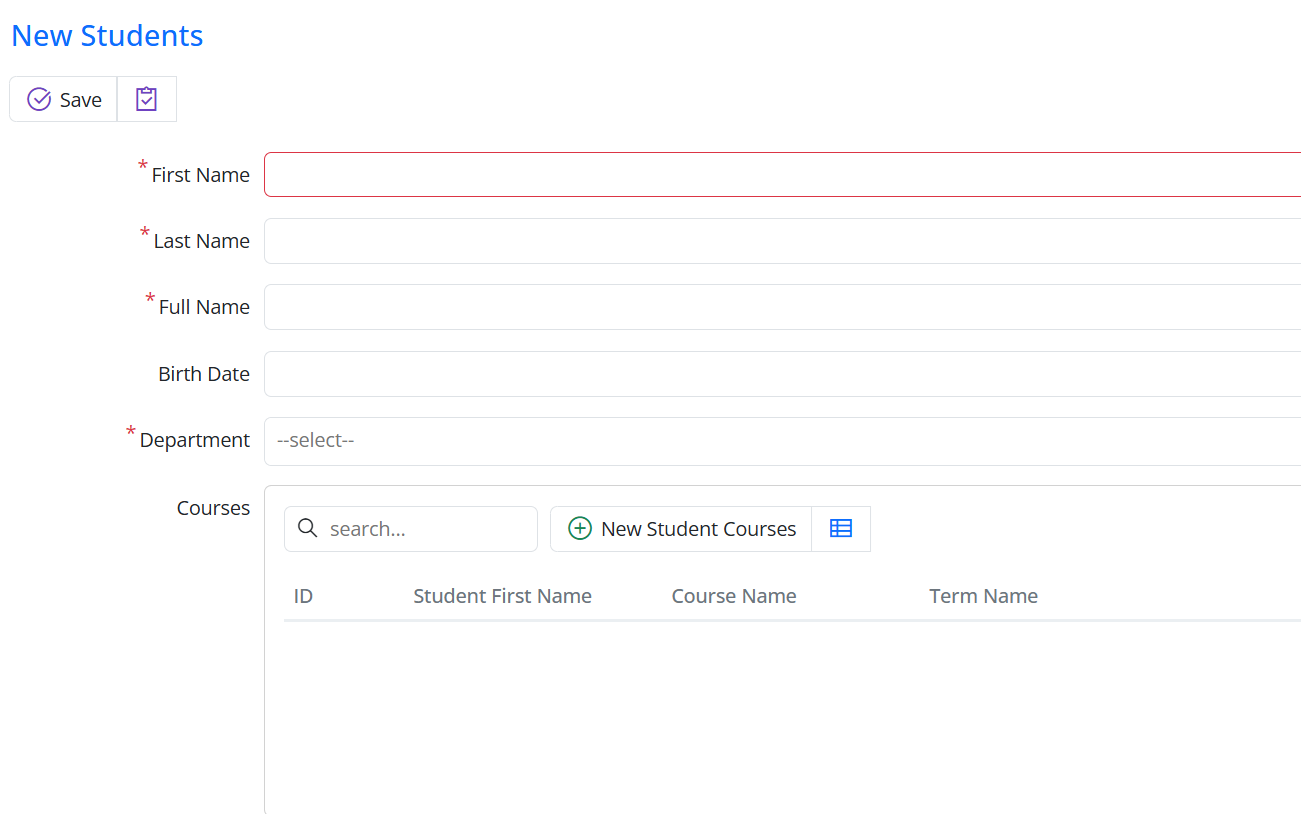
To display the StudentCourses editor within the Student dialog, add the following property to StudentsForm.cs:
[DisplayName("Courses"), StudentCoursesEditor, SkipNameCheck]
public List<StudentCoursesRow> CourseList { get; set; }
Use the StudentCoursesEditor attribute to specify the grid editor for this field.
The SkipNameCheck attribute prevents Serenity from looking for a physical column for this field in the StudentsRow table; this field represents the detail side of the master–detail relationship.
After this change, the Student dialog displays a grid editor to view and edit StudentCourses records.
Use this grid editor to manage course records belonging to the selected student directly within the dialog.
Hiding the StudentId Field in StudentCoursesForm.cs
The StudentId field in StudentCourses is the foreign key for the master–detail relationship; it does not need to be edited by the user.
Therefore, the StudentId field in the StudentCoursesForm.cs file is hidden.
This is done by marking the related field with the Hidden attribute.
[FormScript("CourseDB.StudentCourses")]
[BasedOnRow(typeof(StudentCoursesRow), CheckNames = true)]
public class StudentCoursesForm
{
    [Hidden]
    public int StudentId { get; set; }
    public int CourseId { get; set; }
    public int TermId { get; set; }
}
With this change, the StudentId field is no longer displayed in the dialog. The information about which Student record the detail belongs to is managed automatically by the master–detail relationship.
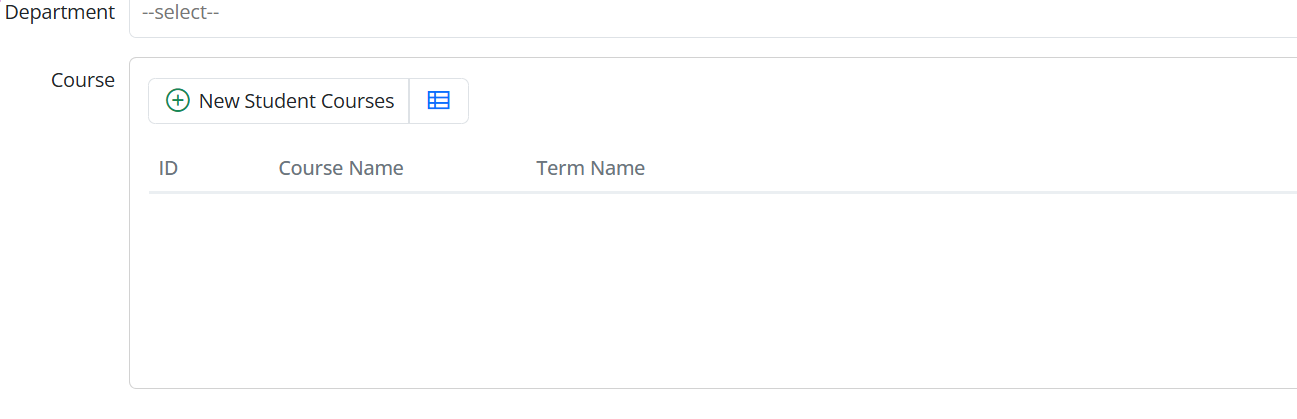
In addition, the column defined in the StudentCoursesColumns.cs file that displays the Student information is also removed.
namespace CourseTutorial.CourseDB.Columns;
[ColumnsScript("CourseDB.StudentCourses")]
[BasedOnRow(typeof(StudentCoursesRow), CheckNames = true)]
public class StudentCoursesColumns
{
    [EditLink, DisplayName("Db.Shared.RecordId"), AlignRight]
    public int Id { get; set; }
    public string CourseName { get; set; }
    public string TermName { get; set; }
}
Since detail records are no longer displayed on a standalone screen and are only shown within the Student dialog, there is no need to display the Student information again in the grid.
After these changes, the StudentCourses editor displays a simplified view containing only the course information.
Defining the Grid Editor Dialog for StudentCourses
In the grid editor, adding and editing detail records is performed through a dialog.
In the master–detail architecture, derive this dialog from GridEditorDialog instead of EntityDialog. Use it only within the grid editor; do not use it as a standalone page.
For this purpose, create a new file named StudentCoursesEditDialog.tsx and define its contents as follows: StudentCoursesEditDialog.tsx
import { Decorators } from "@serenity-is/corelib";
import { GridEditorDialog } from "@serenity-is/extensions";
import { StudentCoursesForm, StudentCoursesRow } from "../../ServerTypes/CourseDB";

@Decorators.registerClass("CourseTutorial.CourseDB.StudentCoursesEditDialog")
export class StudentCoursesEditDialog extends GridEditorDialog<StudentCoursesRow> {

    protected override getFormKey() { return StudentCoursesForm.formKey; }
    protected override getLocalTextPrefix() { return StudentCoursesRow.localTextPrefix; }
    protected form: StudentCoursesForm = new StudentCoursesForm(this.idPrefix);
}
The GridEditorDialog class provides the foundation for the add and edit dialogs used within a grid editor.
Add and edit StudentCourses records through this popup dialog.
This dialog is used only by the grid editor within the Student dialog and is not associated with any standalone list page.
Use this structure to manage detail records within the master dialog in accordance with the master–detail architecture.
Defining the StudentCoursesEditor.tsx File
To enable adding and editing StudentCourses records within the grid editor, define a relationship between the editor and the dialog.
For this purpose, update the StudentCoursesEditor.tsx file as follows:
import { Decorators } from "@serenity-is/corelib";
import { GridEditorBase } from "@serenity-is/extensions";
import { StudentCoursesColumns, StudentCoursesRow } from "../../ServerTypes/CourseDB";
import { StudentCoursesEditDialog } from "./StudentCoursesEditDialog";

@Decorators.registerEditor("CourseTutorial.CourseDB.StudentCoursesEditor")
export class StudentCoursesEditor extends GridEditorBase<StudentCoursesRow> {

    protected override getColumnsKey() { return StudentCoursesColumns.columnsKey;}
    protected override getDialogType() { return StudentCoursesEditDialog;}
    protected override getAddButtonCaption() { return "Add"; }
}
The getDialogType method specifies the dialog type used by the grid editor.
To customize the caption of the add button, override getAddButtonCaption in the editor class:
protected getAddButtonCaption() {
    return "Add";
}
Click the Add button to open the StudentCoursesEditDialog popup dialog.
Add and edit detail records through the dialog.
Use this structure to manage detail records via a dialog in a master–detail architecture.
Defining the Master–Detail Relationship on StudentsRow
The server-side definition of the master–detail relationship is done using the MasterDetailRelation attribute.
Define a list field representing StudentCourses records in StudentsRow.cs.
[MasterDetailRelation(foreignKey: nameof(StudentCoursesRow.StudentId), ColumnsType = typeof(StudentCoursesColumns))]
[DisplayName("Course List"), NotMapped]
public List<StudentCoursesRow> CourseList{get => fields.CourseList[this];set => fields.CourseList[this] = value;}

public class RowFields : RowFieldsBase
{
    public RowListField<StudentCoursesRow> CourseList;
}
The MasterDetailRelation attribute defines the relationship between records in the StudentCourses table and the Student record. In this relationship, the foreign key field used is StudentCoursesRow.StudentId.
The NotMapped attribute indicates that this field is not a physical column in the Students table; use it solely to manage the master–detail relationship.
With this definition:
When you load a Student record, the related StudentCourses records are retrieved automatically.
When you create new detail records, the StudentId field is assigned automatically.
Add, update, and delete detail records together with the master record.
This structure ensures that the master–detail relationship works fully on the server side.
Usage Within the Student Dialog
Because you defined the editor on the StudentsForm, no additional action is required inside the Student dialog.
When the dialog opens:
The Student fields are displayed at the top of the dialog.
StudentCourses records are displayed within the grid editor.
The addition, editing, and deletion of detail records are carried out through a popup dialog.
Conclusion
With these arrangements:
StudentCourses is not used as a standalone screen; detail records are managed only within the Student dialog.
Master and detail records are saved together, and the student–course relationship is structured according to the master–detail architecture.
Advantages Provided by Serenity
This structure is achieved with minimal additional code, thanks to Serenity’s master–detail support.
Detail records are automatically managed during the master record’s save operation.
There is no need to define an additional service or custom record operation.
Data integrity is maintained by the framework.
Creating the Teacher and TeacherCourses Tables
Create the Teachers and TeacherCourse tables to represent the relationship between teachers and the courses they teach.
Define the following migration:
using FluentMigrator;

namespace CourseTutorial.Migrations.DefaultDB
{
    [DefaultDB, Migration(20250707_1015)]
    public class DefaultDB_20250707_1015_TeachersAndTeacherCourse : AutoReversingMigration
    {
        public override void Up()
        {
            Create.Table("Teachers")
                .WithColumn("Id").AsInt32().PrimaryKey().Identity()
                .WithColumn("FirstName").AsString(100).NotNullable()
                .WithColumn("LastName").AsString(100).NotNullable()
                .WithColumn("FullName").AsString(201).NotNullable()
                .WithColumn("Email").AsString(150).NotNullable().Unique()
                .WithColumn("DepartmentId").AsInt32().NotNullable()
                    .ForeignKey("FK_Teachers_DepartmentId", "Department", "Id");

            Create.Table("TeacherCourse")
                .WithColumn("Id").AsInt32().PrimaryKey().Identity()
                .WithColumn("TeacherId").AsInt32().NotNullable()
                    .ForeignKey("FK_TeacherCourse_TeacherId", "Teachers", "Id")
                .WithColumn("CourseId").AsInt32().NotNullable()
                    .ForeignKey("FK_TeacherCourse_CourseId", "Courses", "Id");

            Create.UniqueConstraint("UQ_Teacher_Course")
                .OnTable("TeacherCourse")
                .Columns("TeacherId", "CourseId");
        }
    }
}
Creating the Grades Table
After creating the Students and Courses tables, add the Grades table to store the grades each student receives for each course.
Each grade record belongs to a student and corresponds to a specific course, containing the Midterm, Final, and Average values.
Define the following migration:
using FluentMigrator;

namespace CourseTutorial.Migrations.DefaultDB;

[DefaultDB, Migration(20250616_1200)]
public class DefaultDB_20250616_1200_Grades : AutoReversingMigration
{
    public override void Up()
    {
        Create.Table("Grades")
            .WithColumn("Id").AsInt32().PrimaryKey().Identity()
            .WithColumn("StudentId").AsInt32().NotNullable()
                .ForeignKey("FK_Grades_StudentId", "Students", "Id")
            .WithColumn("CourseId").AsInt32().NotNullable()
                .ForeignKey("FK_Grades_CourseId", "Courses", "Id")
            .WithColumn("TermId").AsInt32().NotNullable()
                .ForeignKey("FK_Grades_TermId", "Terms", "Id")
            .WithColumn("Midterm").AsDecimal(5, 2).Nullable()
            .WithColumn("Final").AsDecimal(5, 2).Nullable()
            .WithColumn("Average").AsDecimal(5, 2).Nullable();

        Create.UniqueConstraint("UQ_Grades_StudentId_CourseId_TermId")
            .OnTable("Grades")
            .Columns("StudentId", "CourseId", "TermId");
    }
}
With this definition:
Each Grades record is associated with a Student and a Course, and the Midterm, Final, and Average fields store the grade information.
This prevents creating multiple grade records for the same student and course.
Generating Serenity Code for the Grades Table
After applying the migration, generate Serenity code for the Grades table using Sergen.
Select the dbo.Grades table, use the CourseDB module, and retain the default All option.
Once code generation is complete, start the application to display the Grades screen under the CourseDB module.
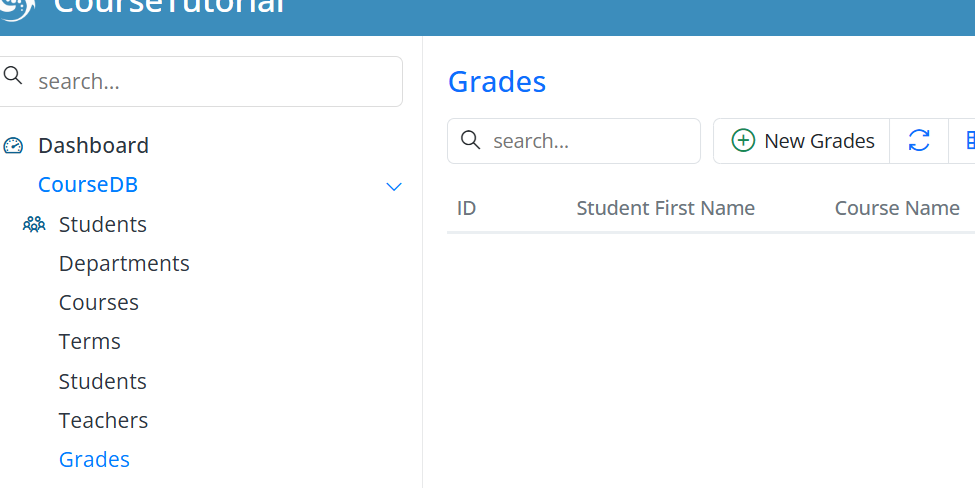
Use this screen to add students’ course grades, edit existing grades, and view grade records.
In this way, the Grades table becomes usable in an integrated manner with the Students and Courses structure.
Automatic Calculation of the Average Field
Currently, the Average field can be entered manually; calculate it from Midterm and Final to prevent errors.
It may cause data inconsistencies, so the average value is calculated automatically on the server side.
Step 1 — Removing the Average Field from the Form
GradesForm.cs:
public decimal? Average { get; set; }
Step 2 — Calculating Average in GradesRow
GradesRow.cs:
public void CalculateAverage()
{
    if (Midterm != null && Final != null)
        Average = (Midterm + Final) / 2;
}
Step 3 — Updating the SaveHandler
GradesSaveHandler.cs:
protected override void BeforeSave()
{
    base.BeforeSave();

    Row.CalculateAverage();
}
Result
With this adjustment, the Average is calculated automatically, user errors are prevented, and data consistency is ensured.
Conclusion
Thanks to Serenity’s powerful framework, the grade calculation process becomes safer, more consistent, and user-friendly.
Using Student FullName in the Grades Table
In the Grades screen, instead of displaying only the student's FirstName, the Full Name (First + Last Name) will be shown. To achieve this:
The FirstName field in GradesRow.cs will be removed.
The FullName field from StudentsRow will be linked to GradesRow.
GradesColumns.cs and the form fields will be updated accordingly.
Updating GradesRow.cs
The unnecessary FirstName field in GradesRow is removed. Instead, a FullName field is added:
[DisplayName("Full Name"), Origin(jStudent, nameof(StudentsRow.FullName))]
public string FullName
{
    get => fields.FullName[this];
    set => fields.FullName[this] = value;
}
// Declaration in the Fields class
public StringField FullName;
Now, GradesRow can use the FullName field directly.
Updating GradesColumns.cs
To display the FullName column in the grid, add the following property to the GradesColumns.cs file:
public string FullName { get; set; }
This allows the student's first and last name to appear together in a single column. StudentId and TextualField
The StudentId field in GradesRow is linked to FullName:
[DisplayName("Student"), NotNull, ForeignKey(typeof(StudentsRow)), LeftJoin(jStudent), TextualField(nameof(FullName))]
[ServiceLookupEditor(typeof(StudentsRow), Service = "CourseDB/Students/List")]
public int? StudentId { get => fields.StudentId[this]; set => fields.StudentId[this] = value;}
Additionally, the field marked as NameProperty in StudentsRow is changed to FullName.
[DisplayName("Full Name"), Size(201), NotNull, NameProperty, QuickSearch]
public string FullName { get => fields.FullName[this]; set => fields.FullName[this] = value; }
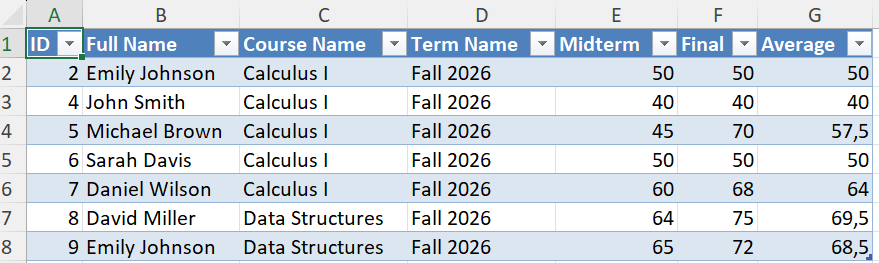
The Student column in the Grades screen now displays the FullName.
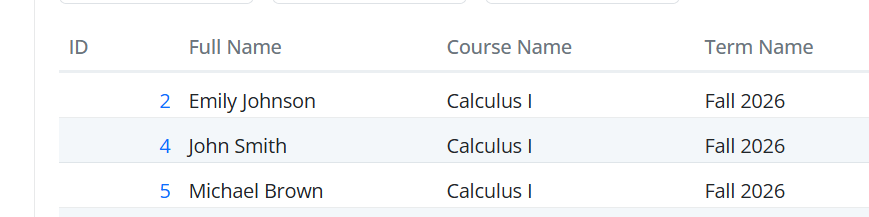
Result
Previously, only the FirstName was visible.
Now, the full name (First + Last Name) is listed in a single column.
This allows the Grades screen to display a column named FullName containing the student’s full name:
Before adding Excel and PDF export buttons to the page, apply filtering using the QuickFilter feature. This will be useful for filtering data in the Excel and PDF exports.
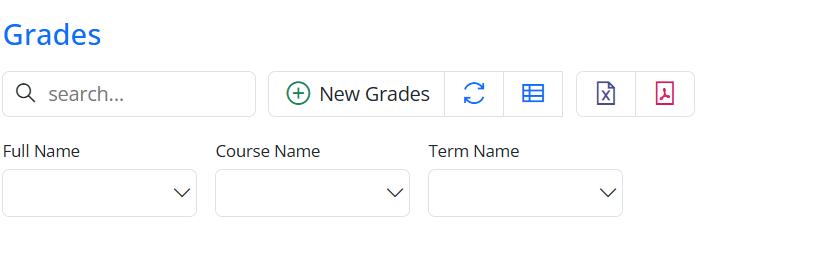
QuickFilter and Excel/PDF Export in the Grades Screen
Before generating Excel and PDF exports in the Grades screen, users are provided with quick filtering options. Using QuickFilter is particularly advantageous when you want to report on filtered data.
Additionally, with ColumnsPicker, users can select and display the fields they want, and export the same fields to Excel or PDF. This directly leverages Serenity’s powerful and flexible grid infrastructure.
namespace CourseTutorial.CourseDB.Columns;

[ColumnsScript("CourseDB.Grades")]
[BasedOnRow(typeof(GradesRow), CheckNames = true)]
public class GradesColumns
{
    [EditLink, DisplayName("Db.Shared.RecordId"), AlignRight]
    public int Id { get; set; }

    [QuickFilter]
    public string FullName { get; set; }

    [QuickFilter]
    public string CourseName { get; set; }

    [QuickFilter]
    public string TermName { get; set; }

    public decimal Midterm { get; set; }
    public decimal Final { get; set; }
    public decimal Average { get; set; }
}
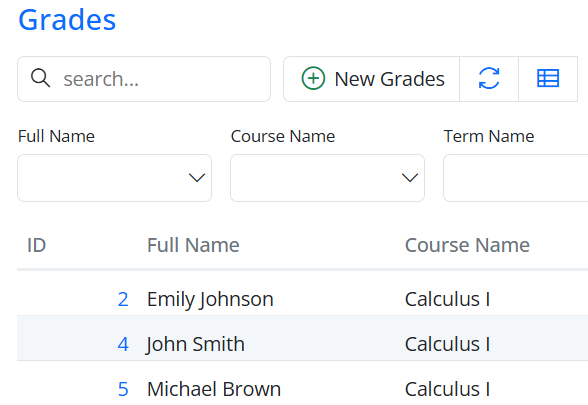
The combination of QuickFilter for filtering and ColumnsPicker for selecting fields stands out as one of Serenity’s most powerful features. The filtering and reporting process is both user-friendly and high-performing.
GradesGrid: Adding Excel and PDF Export Buttons
In the Grades screen, users can export data to Excel or PDF by using buttons in the grid toolbar. Serenity provides a built-in, fully integrated infrastructure that handles both exports with minimal code.
Defining the Grid Class
The GradesGrid class extends EntityGrid
@Decorators.registerClass("CourseTutorial.CourseDB.GradesGrid")
export class GradesGrid extends EntityGrid<GradesRow, any> {
    protected override getColumnsKey() { return GradesColumns.columnsKey; }
    protected override getDialogType() { return GradesDialog; }
    protected override getRowDefinition() { return GradesRow; }
    protected override getService() { return GradesService.baseUrl; }
}
Adding Excel and PDF Buttons
Override the getButtons() method to add export buttons:
protected override getButtons() {
    let buttons = super.getButtons();

    // Excel export button
    buttons.push(ExcelExportHelper.createToolButton({
        grid: this,
        service: GradesService.baseUrl + '/ListExcel',
        separator: true
    }));

    // PDF export button
    buttons.push(PdfExportHelper.createToolButton({
        grid: this
    }));

    return buttons;
}
Explanation:
ExcelExportHelper.createToolButton: Exports grid data to Excel. The service parameter points to the backend endpoint. separator: true adds a visual separator between buttons.
PdfExportHelper.createToolButton: Exports grid data to PDF on the frontend. Any applied filters or selected columns are automatically reflected in the PDF.
Export Process Flow
When a user clicks an export button, the flow works as follows:
Excel Export:
The grid sends a request to the backend endpoint (e.g., /ListExcel).
GradesListHandler.cs retrieves filtered, sorted, and paged records from the database.
IExcelExporter generates the Excel file from the retrieved data.
ExcelContentResult.Create(...) sends the Excel file to the user’s browser for download.
PDF Export:
The grid triggers the export on the frontend.
PdfExportHelper reads the grid data, including any applied filters and column selections.
The PDF file is generated and sent to the browser for download.
Both Excel and PDF exports fully respect the grid’s filtering, sorting, and selected columns.
How Filtering and Columns Work
Both Excel and PDF exports fully respect the grid’s state:
Quick filters, column filters, and sorting are applied automatically.
Columns selected via ColumnsPicker are included in the export.
Only the visible data is exported.
This ensures consistent and accurate reporting.
Serenity Advantages
Minimal code: Developers only need to add the export buttons; no custom backend or frontend code is required.
Fully integrated: Export operations automatically respect the grid’s filters, sorting, and column selections.
Fast and reliable: Serenity uses built-in handler, exporter, and frontend helper services to generate Excel and PDF files.
User-friendly: Users can export exactly what they see in the grid, making reporting simple and intuitive.
Flexible column management: Using Serenity’s built-in ColumnsPicker, users can dynamically choose which columns should be visible in the grid. The export operations also respect these selections, meaning only the selected columns will be included in the Excel or PDF output.

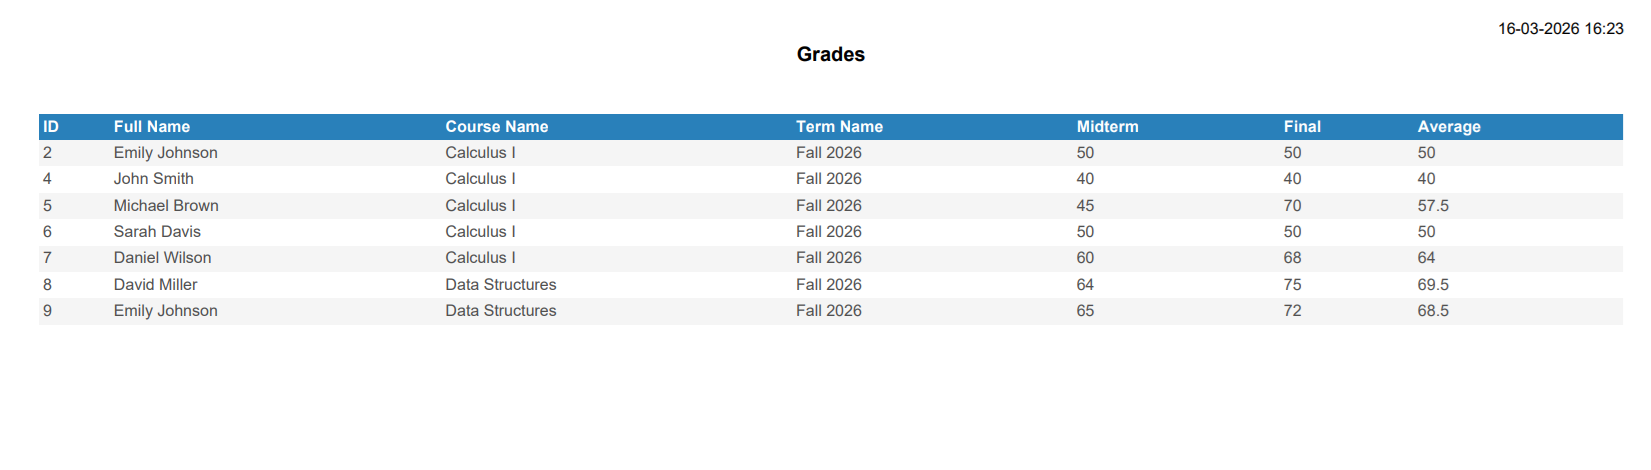
Excel and PDF buttons in the toolbar:
Excel output example:
PDF output example:
Result
Users can now:
Export filtered and sorted data to Excel or PDF.
Select which columns to include via ColumnsPicker.
Generate reports quickly without writing any extra export logic.
Serenity’s helpers leverage the framework’s flexible and powerful grid infrastructure, making reporting fast, reliable, and user-friendly.
Navigation Links and Icon Configuration
Purpose
Group pages under relevant sections and assign meaningful icons to each navigation item to make the sidebar menu more user-friendly and visually organized.
Open the Navigation File
Open the navigation file located under your CourseTutorial module:
Add NavigationLink Attributes
Below are example NavigationLink declarations for each page in your project. Each one includes a meaningful section name, page title, and an appropriate icon.
Icon Support
Serenity templates such as Serene and StartSharp include the Line Awesome icon library, which is a modern alternative to Font Awesome.
Line Awesome is largely compatible with Font Awesome 4.7 icon class names, so you can use icon classes like "fa-book" or "fa-user-graduate" in your NavigationLink attributes.
You can find a comprehensive list of available icons and their corresponding CSS classes on this page.
using MyPages = CourseTutorial.CourseDB.Pages;

[assembly: NavigationLink(int.MaxValue, "CourseDB/Department", typeof(MyPages.DepartmentPage), icon: "fas fa-building")]
[assembly: NavigationLink(int.MaxValue, "CourseDB/Terms", typeof(MyPages.TermsPage), icon: "fas fa-calendar-alt")]
[assembly: NavigationLink(int.MaxValue, "CourseDB/Course", typeof(MyPages.CoursesPage), icon: "fas fa-book")]
[assembly: NavigationLink(int.MaxValue, "CourseDB/Student", typeof(MyPages.StudentsPage), icon: "fas fa-user-graduate")]
[assembly: NavigationLink(int.MaxValue, "CourseDB/Grades", typeof(MyPages.GradesPage), icon: "fas fa-clipboard-list")]
![]()
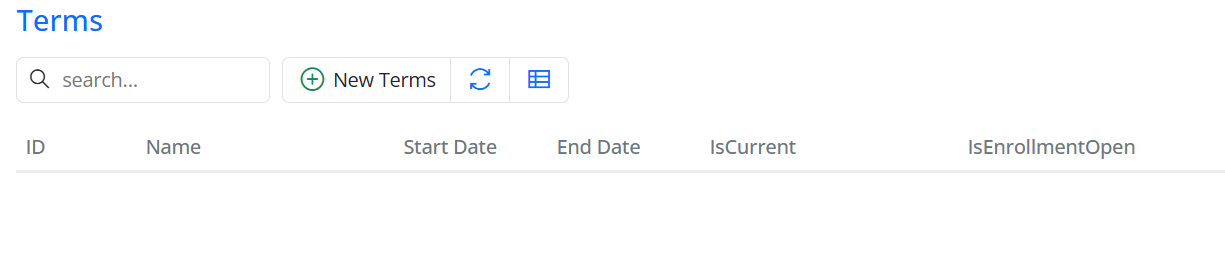
Overriding Column Header and Width
If you want to display a different header in a grid column or dialog field, do it in the columns definition file (typically TermsColumns.cs) instead of editing the row class (TermsRow.cs).
namespace CourseTutorial.CourseDB.Columns;

[ColumnsScript("CourseDB.Terms")]
[BasedOnRow(typeof(TermsRow), CheckNames = true)]
public class TermsColumns
{
    public bool IsActive { get; set; }
    public bool IsRegistrationOpen { get; set; }
}
This column definition is based on the TermsRow entity, and any properties you add here will override the properties defined in the entity class. Next, add [DisplayName], width, and alignment attributes to customize the column headers and widths.
namespace CourseTutorial.CourseDB.Columns;

[ColumnsScript("CourseDB.Terms")]
[BasedOnRow(typeof(TermsRow), CheckNames = true)]
public class TermsColumns
{
    [DisplayName("IsCurrent"), Width(150), AlignRight]
    public bool IsActive { get; set; }

    [DisplayName("IsEnrollmentOpen"), Width(150), AlignRight]
    public bool IsRegistrationOpen { get; set; }
}